Introduction
Are you a die-hard gamer trying to maximize your gaming experience on Windows 10 or Windows 11? There is no need to look any further! You may increase the performance of your games and have a more enjoyable gaming experience by optimizing your PC. In this article, we'll go through seven strategies for optimizing Windows 10 or Windows 11 for gaming. Enabling Game Mode, removing Nagle's Algorithm, managing your active hours, upgrading to an SSD, changing your visual effects settings, using the High-Performance power plan, and defragmenting your hard drive is among the recommendations. So, let's get started and figure out how to optimize Windows 10 or Windows 11 for gaming.
7 Tips to optimize Windows 10 and Windows 11 for Gaming
1. Optimize Windows 10 with Game Mode
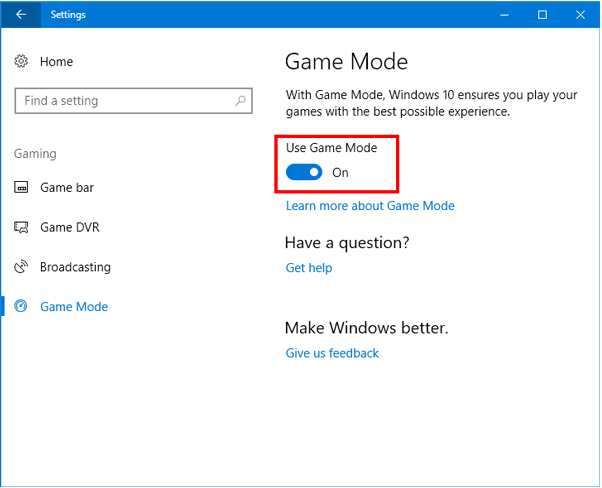
Get the most out of your gaming experience on Windows 10 and Windows 11 by optimizing with Game Mode. To turn on Game Mode, simply press the Windows key and I key together to open Settings, then click on Gaming on the Settings page. From there, navigate to the Game Mode panel and switch the Use Game Mode button to On. This feature will prioritize your system resources for gaming, providing a smoother and more enjoyable experience. Say goodbye to lag and hello to seamless gameplay with Game Mode on Windows 10 and 11.

2. Disable Nagle’s Algorithm
Disabling Nagle's algorithm is a strategy for lowering latency and increasing the speed of online gaming. Nagle's technique is a TCP/IP protocol mechanism that seeks to merge many small data packets into a larger packet before transmitting it across the network. This can improve network efficiency, but it can also cause delays in gaming, especially in fast-paced online games.
To disable Nagle's algorithm on Windows 10, you must change the registry. Here's how it's done:
- Press the Windows key + R to open the Run command.
- Type "regedit" in the Run box and press Enter.
- Select HKEY_LOCAL_MACHINE\SYSTEM\CurrentControlSet\Services\Tcpip\Parameters\Interfaces.
- Find the folder that corresponds to your network adapter and open it.
- Right-click in the right pane and select New > DWORD (32-bit) Value.
- Name the new value "TcpAckFrequency" and set its value to 1.
- Close the Registry Editor and restart your computer.
- You can follow the tips as shown in the screenshot below.
3. Manage Your Active Hours
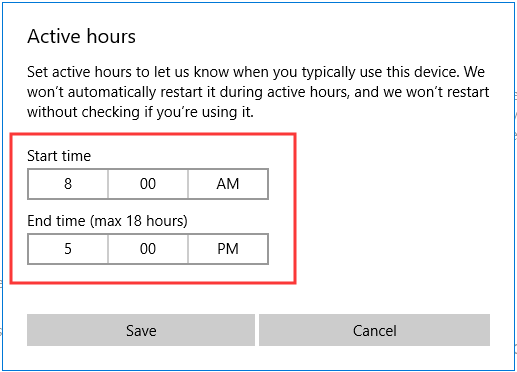
In Windows 10 and 11, managing your active hours can help lessen the impact of software updates and other system maintenance on your gaming experience. Active hours are the times when you use your computer, and Windows will avoid installing updates or rebooting during these times to avoid disturbances.
- Press the Windows key and I key together to open Settings.
- Then choose Update & Security to continue.
- On the right panel, click Change active hours.
- Then set the start time and end time based on your needs. Then click Save.
With active hours enabled, Windows will delay installing updates or restarting your PC during certain times, allowing you to continue gaming uninterrupted. Keep in mind that this may result in updates being installed or your PC being restarted during non-active hours, so save your progress and stop any open apps before you leave your PC.

4. Upgrade Your SSD
Upgrading to a Solid State Drive (SSD) can increase the performance of your Windows 10 gaming experience dramatically. SSDs, as opposed to traditional hard disk drives (HDDs), have no moving parts and can access data significantly faster, resulting in speedier boot times, faster application launches, and overall system performance.
You'll notice speedier boot times, quicker application launches, and greater overall system performance after upgrading to an SSD, which can improve your gaming experience on Windows 10 and 11. Keep in mind that installing an SSD necessitates some technical knowledge, so if you're not confident in your abilities, it may be wise to seek the assistance of a professional.
I have recently upgraded my old PC with SSD now bios speed of the PC is significantly increased nearly by 10 times even though I used to play some games on that old PC.
5. Tweak Your Visual Effects Settings
Tweaking your visual effects settings in Windows 10 can assist in enhancing your game performance by freeing up system resources for gaming. Here's how you can do it:
- Type View advanced system settings in the search box of Windows and choose the best-matched one.
- In the pop-up window, switch to the Advanced tab.
- Then click Settings under the Performance section to continue.
- In the pop-up window, in the Visual Effects tab, choose the option Adjust for best performance. Then click Apply and OK to confirm the changes.
This will disable many of Windows' visual effects and animations, freeing up system resources for gaming. Remember that turning off visual effects may make your system appear less visually appealing, but the enhanced performance may be worth it for a better gaming experience. If you choose, you may always go back and re-enable visual effects later.
6. Use High-Performance Power Plan
By maximizing the utilization of system resources, the High-Performance power plan in Windows 10 can help boost your gaming performance. Here's how to enable the High-Performance power plan:
- Press the Windows key and I key together to open Settings.
- In the pop-up window, choose System to continue.
- Then navigate to the Power & Sleep tab and click Additional power settings.
- In the Power Options window, check the option High Performance.
By selecting the High-Performance power plan, you'll ensure that your system is making the most use of all available resources to maximize gaming performance. Remember that using the High-Performance power plan can result in increased energy consumption and higher temperatures, so use it only when gaming and switch back to a more energy-efficient power plan when not gaming.
7. Defragment your Hard Drive
By rearranging the data on your hard drive and making it easier for the system to access the files it requires, defragmenting your hard drive can assist enhance your gaming performance. In Windows 10, here's how to defragment your hard drive:
- Right-click on the Start button and select Control Panel.
- Click on System and Security.
- Click on Administrative Tools.
- Double-click on Defragment and Optimize Drives.
- In the Optimize Drives window, select the hard drive you want to defragment.
- Click on the Analyze button to check if the hard drive needs to be defragmented.
- If the hard drive needs to be defragmented, click on the Optimize button to start the defragmentation process.
 |
Depending on the size of your hard disk and the amount of data that needs to be arranged, defragmenting it can take some time. However, for gamers, the better performance may be worth the wait. To keep your system working smoothly, defragment your hard disk on a regular basis, such as once a month.
Conclusion
Optimizing Windows 10 for gaming involves several steps to improve the performance of your system. These steps include enabling Game Mode, disabling Nagle's Algorithm, managing your active hours, upgrading to an SSD, tweaking your visual effects settings, using the High-Performance power plan, and defragmenting your hard drive. By following these tips, you can improve the performance of your system, allowing for a smoother and more enjoyable gaming experience. However, keep in mind that these tips may not work for every system and that individual results may vary. Nevertheless, optimizing Windows 10 is an excellent way to get the most out of your gaming experience.


.png)

0 Comments